To create a music that will play continuously in the background in the game, follow the steps below.
1. While the "game" Scene and "Game" Node are selected, create a new Node.
2. In the Create New Node window that appears, search for and select the expression AudioStreamPlayer2D in the Search line and click on the Create button.
3. Change the "AudioStreamPlayer2D" Node name to "Music".
4. Double-click on the "res://assets/music/time_for_adventure.mp3" file under the "FileSystem" tab and check that the "Enable" box under the "Loop" statement is checked, then close the window. Drag the file and drop it into the "Stream" line under the "Inspector" tab.
5. Check the On box to the right of the "Autoplay" line.
6. While the "Music" Node is selected, select the "Audio" option from the bottom line of the IDE.
7. To add different buses to control the sound, click the "Add Bus" button twice to create two "Buses". change the name of these "Bass" to "Music" and "SFX".
8. Under the "Inspector" tab, select the "Bus" line value as "Music".
9. We can control the volume of the music using the Slider on the "Music" Bus. set the value to -12. In this case, the music plays, but when the scene reloads, the music starts again.
10. To fix this, drag and drop the "Music" Node into "res://scenes/".
11. Add this Scene as autoload. Autoload is global Scene and Scripts, and they continue throughout the game, regardless of which Scene is loaded.
12. Delete the "Music" Node in the "game" scene.
13. In the window that opens from the "Project - Project Settings..." menu, select the "AutoLoad" tab in the "Globals" tab.
14. Click on the button to the left of "Node Name:" and select the "music.tscn" file, then click on the "+ Add" button to add it to the window.
15. When we run the game, no Music Node appears in the "game" Scene, but the music continues to play continuously, and when the game restarts, the music continues to play where it left off.
To add a "coin" collection sound, follow the steps below.
1. Select the "coin" Scene.
2. While the "coin" Node is selected, create a new Node.
3. In the Create New Node window that appears, search for and select the expression AudioStreamPlayer2D in the Search line and click on the Create button.
4. Change the "AudioStreamPlayer2D" Node name to "PickupSound".
5. Drag the "res://assets/sounds/coin.wav" file under the "FileSystem" tab and drop it into the "Stream" line under the "Inspector" tab.
6. Select the "Bus" value as "SFX".
7. While the "Coin" Node is selected, create a new Node.
8. In the Create New Node window that appears, search for AnimationPlayer in the Search line, select it, and click the Create button.
9. Click the "Animation" button.
10. Change the name of the animation to "pickup".
11. Since our first goal is to hide the "Coin" when we collect it, select the "AnimatedSprite2D" Node.
12. Select "Animation" from the bottom line of the IDE.
13. When we click on the key button to the right of the "Visible" line, in the window that appears, while "Create RESET Track(s)" is selected, click on the "Create" button.
14. A different animation track named "RESET" is created.
15. While the "pickup" animation track is selected, uncheck the On box to the right of the "Visible" line and click the switch button on the right.
When the "RESET" animation track is selected, the On box to the right of the "Visible" line is checked.
16. To prevent collision while playing, change the "CollisionShape2D" Node. While the "CollisionShape2D" Node is selected, under the "Inspector" tab, when we click the key button to the right of the Disabled line, in the window that opens, click the "Create" button.
17. Check the On box in the "Disabled" line and click the key button to the right again.
18. While the "PickupSound" Node is selected, under the "Inspector" tab, when we click the key button to the right of the "Playing" line, in the window that opens, click the "Create" button.
19. While "Animation" is selected in the lower window of the IDE, when we click the box to the right of the "playing" option under "PickupSound", check the On box in the "Value" line that appears under the "Inspector" tab.
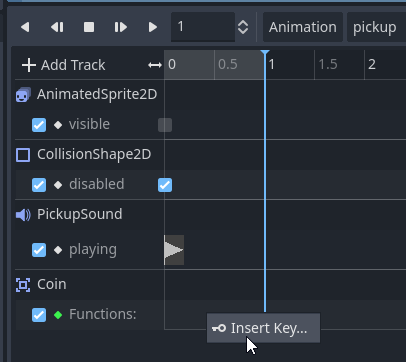
20. Do the same for the "disabled" option under the "CollisionShape2D" line. As a result, the window display of the "pickup" and "RESET" animation tracks should be as follows.
21. To add a different track, click on the "+ Add Track" button and select the "Call Method Track..." option from the menu.
22. Select the "Coin" value in the window that opens and click the "OK" button.
23. Click on the "Insert Key" option that opens when we right-click on the "Functions" line under the "Coin" line added to the window at the bottom of the IDE.
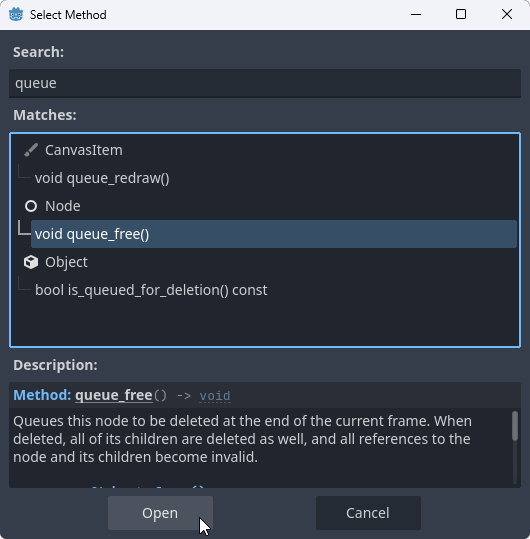
24. In the window that opens, search for the "queue" value, select the "void queue_free()" option and click the "Open" button.
25. The queue_free() function is added to the point corresponding to the vertical blue line in the "Functions" line.
26. Select the "RESET" animation track.
27. While the "coin.gd" file is selected, drag and drop the "AnimationPlayer" node to the line just above the "_on_body_entered" function line. hold down the "Ctrl" key before dropping.
28. Edit the "coin.gd" file as follows.
extends Area2D

@onready var game_manager: Node = %GameManager
@onready var animation_player: AnimationPlayer = $AnimationPlayer

func _on_body_entered(_body: Node2D) -> void:
	game_manager.add_point()
	animation_player.play("pickup")
When we run the program, the sound file is played every time the Player collects Coins.
Save all the scenes with Ctrl-S.